This guide assists in identifying where a particular stamp was located on the printed sheet. It modifies the details prepared by Mr. Norm Sheppard in 1979.
Two guides are provided:
- a map on the stamp indicating where flaws are located;
- a sequenced list of steps to help to identify flaws unique to a particular stamp from which the stamps location can be identified. It is then possible, by clicking on a hyperlink, to consult the full diagram to confirm your identification and to obtain other flaws characteristic of that stamp.
If you wish to have a closer look at a particular flaw on the following pages, hold down both ctrl and the plus sign - on a Mac, use COMMAND and the plus sign - (or scroll) (press + once or twice) to zoom in a little). This will also reduce the clarity of the image. Then hold down ctrl - to zoom back out. Of course you can use the zoom option on the main menu.
Examine your 1d (1/-) NSW Charity stamp to determine possible flaws. Compare your findings with the map which follows and select the stamp number you consider to be appropriate. Then look for the full details for that stamp number by clicking on the relevant number in the table which follows the map.
Top left corner. |
Top right corner. |
|
 |
||
Lower left corner. |
Lower right corner. |
| Position with Sheet Columns | |||||
| Sheet Row 1 | 1 | 2 | 3 | 4 | 5 |
| Sheet Row 2 | 6 | 7 | 8 | 9 | 10 |
| Sheet Row 3 | 11 | 12 | 13 | 14 | 15 |
| Sheet Row 4 | 16 | 17 | 18 | 19 | 20 |
| Sheet Row 5 | 21 | 22 | 23 | 24 | 25 |
| Sheet Row 6 | 26 | 27 | 28 | 29 | 30 |
Step 1: Examine the outer vertical frame on the left.
| A cut through the outer left frame 1 mm below top left corner. |
 |
Stamp 16. | Row 4, Stamp 1. |
| A cut in the outer left frame 11 mm below top left corner. |
 |
Stamp 28. | Row 5, Stamp 3. |
| A small vertical dash of green in the margin 15 mm below the top corner. |  |
Stamp 18. | Row 4, Stamp 3. |
| A cut through the outer left frame 21 mm below top left corner. Also a notch in the inner frame |
 |
Stamp 6. | Row 2, Stamp 1. |
If Step 1 revealed no results, continue to Step 2.
Step 2: Examine the outer top frame.
Small colour projection up from the top frame 4.5 mm from the top left corner. Significant differences with stars, etc. |
 |
Stamp 26. | Row 6, Stamp 1. |
| A cut through the top frame 17.5 mm from the top left corner. |
 |
Stamp 14. | Row 3, Stamp 4. |
A cut through the top frame Also three breaks in the outer right frame 1 mm, 8 mm and 13 mm below top right corner. |
 |
Stamp 25. | Row 5, Stamp 5. |
If Step 2 revealed no results, continue to Step 3.
Step 3: Examine the outer vertical frame on the right.
Frame lines do not meet in top right corner.
Lower right corner has a horizontal split. |
 |
Stamp 4. | Row 1, Stamp 4. |
| A diagonal cut through the outer right frame 3 mm below top right corner. |  |
Stamp 21. | Row 5, Stamp 1. |
A cut through the outer right frame
Also the outlines of the flower to the left of ONE PENNY are defective. |
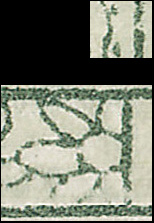 |
Stamp 1. | Row 1, Stamp 1. |
| A small cut through the outer right frame 10 mm below top right corner. | 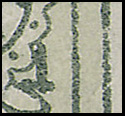 |
Stamp 24. | Row 5, Stamp 4. |
| A small cut through the outer right frame 12 mm below top right corner (just below 1st petal) . |
 |
Stamp 12. | Row 3, Stamp 2. |
| A cut through the outer right frame 1 mm above lower right corner. |
 |
Stamp 15. | Row 3, Stamp 5. |
| A cut through the outer right frame just above the corner join with the lower frame. |
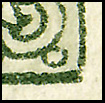 |
Stamp 5. | Row 1, Stamp 5. |
| Lower right corner is pointed. | 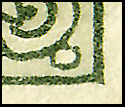 |
Stamp 10. | Row 2, Stamp 5. |
If Step 3 revealed no results, continue to Step 4.
Step 4: Examine the slogan.
| B of BUT has vertical projection at the right. |  |
Stamp 27. | Row 6, Stamp 2. |
| B of BUT has a vertical split in the left upright. |  |
Stamp 2. | Row 1, Stamp 2. |
| B of BUT has a cut through the lower half. |  |
Stamp 3. | Row 1, Stamp 3. |
| ES in GREATEST joined. |  |
Stamp 17. | Row 4, Stamp 2. |
| O of OF is broken at the base. | 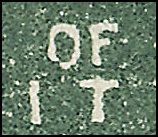 |
Stamp 7. | Row 2, Stamp 2. |
| T of THESE has round projection to the right of the upright. | Stamp 11. | Row 3, Stamp 1. | |
| 16 instead of IS (or a protrusion from the curve of S). |  |
Stamp 12. | Row 3, Stamp 2. |
| Y of CHARITY has large colour dot on right branch. |  |
Stamp 20. |
Row 4, Stamp 5. |
If the characteristics to locate the stamp have still not been identified, try the following checklist of flaws.
Step 5: Miscellaneous characteristics.
| The triangular slash following the left 1 (/) has a white projection from the upper edge. |
 |
Stamp 8. | Row 2, Stamp 3. |
| A of POSTAGE has a notch towards the top of the right arm. |  |
Stamp 19. | Row 4, Stamp 4. |
| The flower to the left of ONE has broken outlines on the 2nd and 3rd petals to the left as well as on the underside of the scalloped ornament to the left of those flowers. | 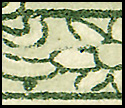 |
Stamp 9. | Row 6, Stamp 2. |
| Angel's front hair extended. The mountain beyond has a small mark in front of her hair disturbing the otherwise straight outline. |  |
Stamp 23. | Row 5, Stamp 3. |
White dot next to the pony tail of the Angel. Dot is not close to her wing (which is the case in Stamp 26). |
 |
Stamp 29. | Row 6, Stamp 4. |